We have all experienced the time saving features available in Xero such as bank rules and Xero Me for employees, amongst others. Here are some neat tips and tricks to make your experience using Xero even better.
Xero keyboard shortcuts
These are really useful keyboard shortcuts which work not only in your browser, but also in Xero.
| SHORTCUT KEY FOR XERO | RESULT |
| Click the scroll wheel on the mouse OR mouse right click (open in new tab) | Opens a link in a new Tab |
| Ctrl+Tab | Moves to the next browser Tab |
| Ctrl+Shift+Tab | Moves to the previous browser Tab |
| Ctrl+F4 | Closes the current browser Tab |
| Tab | Moves the cursor to the next input box |
| Shift+Tab | Moves the cursor to the previous input box |
| Esc | Closes any current popup dialogue box |
| Alt F4 | Closes the entire browser |
When looking into a file abnormality you cannot go past the mouse wheel to open all those transactions to investigate. This saves you from having to return to pages in Xero when navigating away from one screen to another.
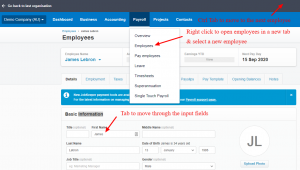
Example 1 – Updating employee templates
If you have a number of employee templates to amend, opening different employees in new tabs helps you to keep track of those you have edited and those still outstanding.
- Open the first employee on the “Employees” page which can be found under the “Payroll” menu item.
- Open the “Employees” page in a new tab by clicking on the “Employees” menu item with the mouse scroll wheel or by right-clicking with the mouse. Then select your next employee to work on.
- Repeat this step for each employee.
- Use the Ctrl+Tab button to move to the next employee, or use Ctrl+Shift+Tab to move back through the employees.
- Press the Tab button on the keyboard to move through the input boxes on the screen, or the Shift+Tab buttons to move backwards.
- When finished editing an employee, click the green Save button and press Ctrl+F4 to close that Tab.
TIP: The most user friendly browser here is Chrome as otherwise the Tabs will squash up if there are too many to display across the screen.
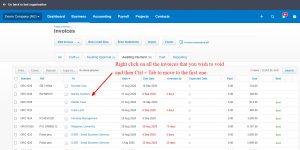
Example 2 – Using shortcuts to void Invoices
If you need to work on a number of invoices, it is a pain to have to navigate to and from the “Invoices” page. By opening invoices in new tabs you can keep the “Invoices” page open and go back to it at any time.
Let’s assume you have a few invoices awaiting payment that need to be voided.
- Open one of the invoices to be voided – you can search in the “Awaiting Payment” section of “Invoices”.
- Click on the invoice with the scroll wheel on the mouse or by right clicking with the mouse to open it in a new Tab.
- Repeat for the other invoices that you wish to void.
- Use the Ctrl+Tab button to move to the first Invoice.
- Select “Void” from the “Invoice Options” to delete the Invoice.
- Select Ctrl+F4 to close the Tab when done which takes you to the next Invoice to be voided.
- When finished select Ctrl + F4 and you can go back to the Invoices tab to keep working on the invoices. Just refresh to bring it up to date.
Hopefully, these tips will save you a bit of time in the future, they become second nature after a while!